Vespa SS Tank Change
Christmas is a quiet time in Jersey for scooters, but there was one job to do. We needed to change the petrol tank on our Vespa SS 180. We found out that the scooter's current petrol tank was not original and looked as if it was from a Vespa PX. Also, the tap started to become faulty and was not turning the petrol off properly. We needed to change the tank and ordered a new SS tank from SIP.

New Vespa SS tank just out of the box
The first job was to degrease the tank before priming, otherwise this could cause the primer/paint to bubble if not removed properly. Using a jug of degreaser and paper towels, I cleansed and then dried the tank.Now it was time to prime the tank. Three coats of primer ensured it was completely covered.


The tank just after being primed
After the priming was complete it was time to pick the right colour red to match the rest of the scooter. I visited one of the paint matching shops here in Jersey and they provided me with the closest red to the scooter itself. Thankfully it was a good match.
I waited at least thirty minutes in-between each spray before adding another coat. In total I gave the tank 6-8 coats of paint before I added lacquer for the finish.

Tank after first few layers of paint
I gave the tank a total of 3 coats of lacquer to get the finish I wanted. In between each coat I left the lacquer to dry for at least four hours. I have some photos below of the finished spray job.


After the spray job was completed and the tank was put back together, I then had to undertake the task of putting the tap in to the tank. To do this you need the tap tool to tighten the nut inside the tank which keeps the tap in place. To start the tightening process, I used a long screw driver to make sure the nut was perfectly on the tap and then went back to using the tool. Once this was done I could then put the tank back in to the scooter with some fresh fuel to make sure it worked.
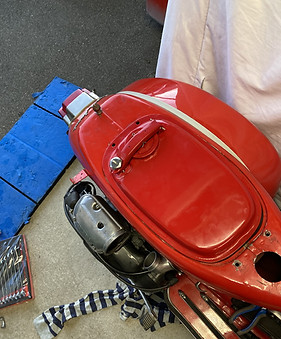
Finished tank back in the Vespa

Tap tool in Vespa SS
I am very happy with the finished product and I am happy to say the tank is working perfectly. If you have any questions on how to install a new tank please contact me in the contact us page.